To provide the best experiences, we use technologies like cookies to store and/or access device information. Consenting to these technologies will allow us to process data such as browsing behavior or unique IDs on this site. Not consenting or withdrawing consent, may adversely affect certain features and functions.
The technical storage or access is strictly necessary for the legitimate purpose of enabling the use of a specific service explicitly requested by the subscriber or user, or for the sole purpose of carrying out the transmission of a communication over an electronic communications network.
The technical storage or access is necessary for the legitimate purpose of storing preferences that are not requested by the subscriber or user.
The technical storage or access that is used exclusively for statistical purposes.
The technical storage or access that is used exclusively for anonymous statistical purposes. Without a subpoena, voluntary compliance on the part of your Internet Service Provider, or additional records from a third party, information stored or retrieved for this purpose alone cannot usually be used to identify you.
The technical storage or access is required to create user profiles to send advertising, or to track the user on a website or across several websites for similar marketing purposes.

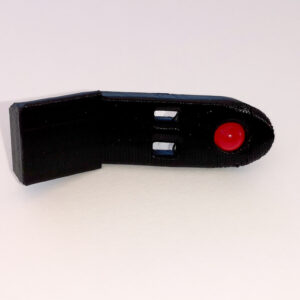
Hello Ralph, I have two suunto compass, with bellow broken.
I need two suunto compass bellow replacement kid.
Can you help me ?
I am from Andorra
Back in stock now.
* Njal
Hi Njål
I also need two replacement kits please. Thanks Steve
my suunto compass is of wall mounted type, but the dimensions of the broken diafragm bellows are similar. My cup is somewhat deeper, but your design would fit anyway.
I would only need the PU cup.
Can you still print one for me?
Sure
Hi, I am looking for a replacement diaphragm for a B95 suunto (slightly smaller). Can you tell me what it possible? Best regards, Matthew in USA
Hi, are you still supplying the repair kits? I require a kit as my suunto compass on my Bavaria 31 from 1999 is totally dry due to the membrane leaking. I am based in England. I look forward to hearing from you soon. Kind regards, John
Yes, I just printed some new ones 🙂
Order now placed and I look forward to receiving your repair kit. Kind regards, John
Hello Njål,
Sorry to bother you but I have no news about the package.
The tracking number has not given any result for a week.
Do you know what’s going on?
Thank you in advance for your answer
Regards
Hi!
The tracking is for some reason not updated until it arrives at the national post sorting facility. I see that the tracking was updated about an hour after your post, so hopefully you can see the updates from now on 🙂
-Njål
Yesssssssss !
I just saw this information.
Thank you again
Best regards
Jean-Yves
Hi
I have a Bavaria 40 – 2001. I need a repair kit for the compass. It is
The original equipment. Is it a Sunto 115 or 125, do you happen to know? Are they the same fitting? Please confirm you have stock.
I´ve stumbled upon your work – very impressive! I have a riviera bu1 compass that seems to have the same problem, though the seal is much easier to dismount. I´ve purchased a 3d printer and some tpu filament, but it does not work at all. even if I print it as a flat surface (without the expansion body) it is not sealing at all. although it feels like a flat surface, you can blow through the material – it is like a filter – not a gasket. Do you have any hints?
It’s not easy, I’ve used quite some time tuning the printer to get it right.
First I would suggest tuning the filament multiplier really well. Depending on how soft the tpu you are using is (mine is very soft), it will deform quite a bit in the extruder making any calibration for e.g. PLA useless. When I used a titan extruder with a bowden setup, I had to use a multiplier of ~1.40. Nowadays I use a Sherpa MINI Extruder, direct feeding and a multiplier of 1.12. I used a caliper to measure the amount of filament actually fed when telling it to extrude 100mm @ printing speed, and calibrated it that way. I repeated this multiple times to get it right. Next I set the max volumetric speed at 2.5 mm^3/s. 0.15mm layer height, 3 solid layers top and bottom. Ironing on. 2 perimeters. Extra perimeter on odd layers on (superslicer has this option). I also tuned the extrusion width to fit the wall thickness in the 3d model, so I get a wall thickness of two through the whole cup. Then I ensure the seam position is set to nearest, so I get a continuous seam. I’ve recently used the function “one-loop perimeters” also, as this should in theory make the seam less of an issue. After printing I use a soldering iron to seal the seam anyway, as this is the part most susceptible to leaks.
Of course bed needs to be level, and flat. I think I run the hot-end slightly hot, to ensure good layer adhesion.
Hope this helps.
Hi Njal,
vielen Dank für die schnelle Lieferung. Den Kompass habe ich gleich instandgesetzt und mit “Penaten Pflege öl” befüllt. Die Reparatur war Dank des Manuals sehr einfach umzusetzen.
Da meine X-99 noch einen zweiten Kompass besitzt hoffe ich, das dein 3D Drucker im neuen Jahr fleisig seine Arbeit aufnimmt und den shop gleich auffüllt.
Beste Grüsse Ralf
Hi Njal
Do you have the repair kit available?
I do need one
Hej Njål!
I’m interested to buy a repair kit if you still are making these.
Hello
Any chance to get the repair kit of you or do I need to print them by myself?
Hi,
I receiver a compass repair kit last year and succesivly repaired one of my compases. Now the second compas have given up. Thereby want to order another repair kit.
Best Regards, Assen
Hej, kan jag beställa ett renoveringskit till suuntocompass?
Hi Njal,
I have a Suunto Compass, 1992 version, very similar to the unit you show for installing the bellow repair kit. I actually don’t have any leakage of my fluid presently. My problem is with the plastic dome you show in the reassembly of the compass. Yes, I broke the plastic dome and need a new one. If there is a possibility you have a dome you wish to sale, I would be thrilled to purchase one.
My website is presently not up.
Thanks
Tom
Hei. Driver du med dette fortsatt?
Hva med kompensatorblæren? Finnes det nye der?
Moin Moin aus Nordfriesland,
Per Zufall bin ich auf Ihre Webseite gestoßen. Reparieren Sie einen undichten Suunto Kompass auch, wenn ich Ihnen den zuschicke? Welche Kosten kämen etwa auf mich zu?
Vielen Dank für Ihre Rückantwort und mit freundlichen Grüßen
U. Meyer
Hello Njal,
I would like to purchase a Suunto Bellow Repair kit.
I cannot find a model number on the compass but it looks identical as the one on your website. The one on the Bavaria pedestal.
The cup is approximately 50 mm. tall en diam. bottom 75 mm, top 95 mm.
Can you please let me know if and when the Repair kit will come in stock again?
Thank you very much for your cooperation.
Have a nice Christmas.
Greetiings,
Martin from Holland.
Hello Njål,
Last year on December 23 I left a reply where I asked if you where going to produce more repairkit’s for the Suunto Compass. Unfortunately I did not get a reply from you yet.
Can you please let me know?
Thank you very much.
Regards, Martin.
Hi
I would be keen on getting two repair kits for my Suunto compass. Are you still making the repair kits?
Thanks
Blair
Here is another individual looking for your repair kit for the SUUNTO 116 compass… (I have three of these here, and I’d very much like to keep them going…)